How to set up and work with Ubuntu Remote Desktop
- HelpWire
- →
- Blog
- →
- Linux Remote Access
- →
- Ubuntu Remote Desktop
Remote desktop software is necessary when accessing a home or work computer from a distant location. This article is going to talk about implementing an Ubuntu remote desktop. We’ll discuss how to connect to Mac or Windows systems with Ubuntu remote desktop software. We will also identify reliable remote desktop software for Ubuntu systems.
HelpWire as a Ubuntu remote desktop solution
Remmina is a great solution that comes preinstalled with many Ubuntu distributions, but it may lack some functionality and support for other platforms. An alternative method for connecting from Ubuntu to other platforms utilizes third-party solutions like HelpWire.
HelpWire is a free remote desktop for Linux developed by Electronic Team, Inc., designed to facilitate remote support for PCs, laptops, and workstations across Windows, macOS, and Linux platforms. It enables technicians to access clients’ computers instantly, streamlining IT support and enhancing productivity for customer support teams of all sizes.
How to install HelpWire on Ubuntu?
HelpWire stands out as a reliable and user-friendly choice for remote support, offering secure Ubuntu remote desktop capabilities alongside easy access and control over other distant devices. Here’s a cleaner installation guide for HelpWire Operator on Ubuntu:
Option 1: Installation via Software Center
-
Download the DEB Package
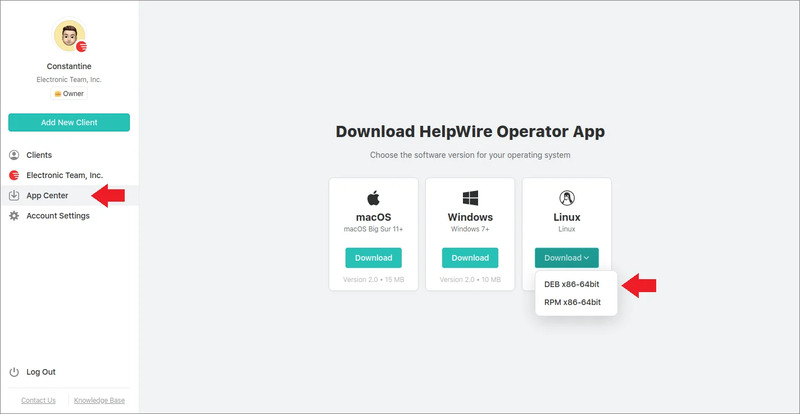
Log in to your HelpWire account and download the HelpWire Operator DEB package from the App Center.
-
Open with Software Center
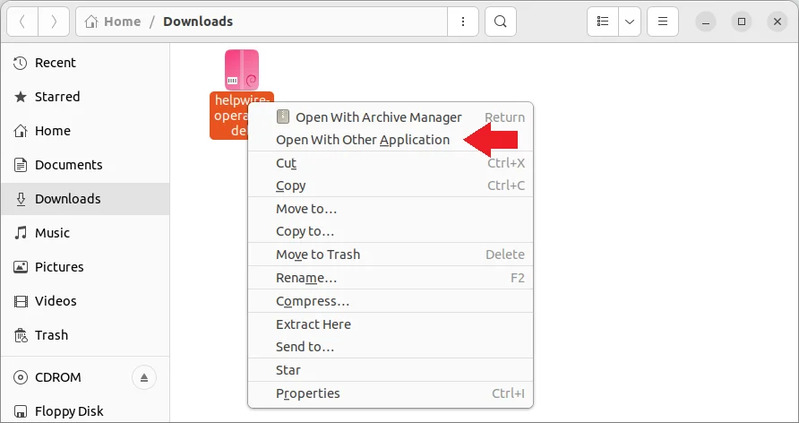
⚬ Right-click the downloaded .deb file.
⚬ Select “Open With Other Application” from the context menu.
⚬ Choose Software Install, then click Select.

-
Install the App
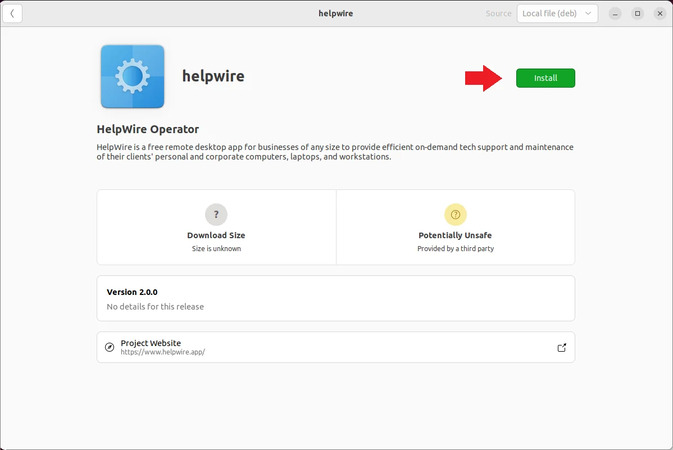
⚬ Click the Install button in the Software Center window.
 ⚬ Enter your administrator password when prompted and click Authenticate.
-
Verify Installation
⚬ Once installed, a red Delete icon will appear in the Software Center.
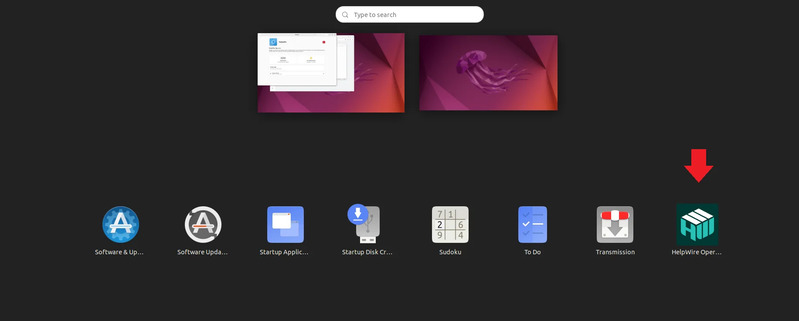
⚬ The HelpWire Operator shortcut will now be available in your applications menu.

To initiate a remote session, click “Connect” from the client’s screen icon in your HelpWire account using your browser.
Launching the app separately will only initiate a one-time Quick Connection, which won’t retain chat history or session details.
Option 2: Installation via Terminal
- Update Package Lists
sudo apt-get update
- Install Python Dependencies
sudo apt-get install python-is-python3
- Install the HelpWire DEB Package
Run one of the following commands (adjust path as needed):
sudo apt install ‘/home/atest/Downloads/helpwire-operator.deb’or
sudo dpkg -i ‘/home/atest/Downloads/helpwire-operator.deb’ - Fix Missing Dependencies (if needed)
sudo apt-get install -f
Once complete, HelpWire Operator will be ready to use.
Key Features:
-
Remote Desktop Control:Technicians can establish high-speed connections to clients' devices, providing quick fixes to their problems, making it an ideal choice for businesses utilizing Linux-based systems.
-
Cross-Platform Compatibility:HelpWire supports connections from Windows, Linux, and macOS, offering secure Ubuntu remote desktop capabilities alongside support for other operating systems.
-
Multi-Monitor Support:The software allows viewing and managing multiple computer screens simultaneously, enhancing your support experience.
-
File Transfer:Users can exchange files with clients by dragging and dropping them onto the HelpWire window, facilitating seamless data sharing for Windows, macOS, and Linux environments.
-
Integrated Chat:Real-time communication is enabled through a built-in chat feature, improving collaboration during support sessions.
-
Client and Team Management:HelpWire offers tools for managing client information and support teams, including features like client directories, workstation grouping, and role hierarchy.
Security Measures:
HelpWire employs industry-standard security protocols, including TLS/SSL cryptographic protocols and AES-256 encryption standards, ensuring secure remote sessions. It prioritizes direct connections over routing data through the external servers whenever possible. The software uses well-known and trusted authentication and hosting services. These measures are essential for establishing secure connections and safeguarding sensitive data.
Configuring a remote desktop on a Ubuntu system
If you are using Ubuntu 18.04 or a later distribution, screen sharing is built into the operating system. This means you only have to install a remote desktop solution on the Ubuntu machine.
Virtual Network Computing (VNC) is the communication protocol we will use when setting up a remote desktop to a Ubuntu box. Fortunately, VNC is tightly integrated with Ubuntu, making it easy to set up remote desktop connectivity. The computer that will be sharing a desktop needs to be configured as a VNC Server. Accessing that desktop over VNC requires the use of VNC client software.
Alternative solutions to VNC are available for implementing an Ubuntu remote desktop. We chose VNC since it’s an open source solution that works well with Linux distros.
Ubuntu supports Vino as a VNC Server. Install Vino with the following command: sudo apt-get install vino -y.
How to set up Ubuntu VNC server
-
In the Settings window, choose Sharing from the left-hand panel. Users familiar with macOS will be very comfortable performing the configuration.
-
Choose Screen Sharing from the available options which also allow users to configure remote login and file sharing. The file sharing option can be used to implement a SAMBA server to provide file access over a network. The default is to have screen sharing turned off.
-
Click on Screen Sharing to enable it. Make sure the Allow connections to control the screen checkbox is selected.
-
In the Networks field, choose the network that will be used for the connection and turn on access with the slider at the bottom of the dialog box.
-
Select the Require a password option to limit access when users connect to the remote desktop on the Ubuntu system. Failure to activate this setting exposes the VNC Server to unauthorized users. When active, a dialog will be presented to VNC clients who are attempting to connect to the VNC server requesting the configured password.
-
Close the dialog, as the setup for the VNC server is now complete.
Connecting to an Ubuntu remote desktop from Mac

-
Open Finder and look under the Shared tab in the left panel.
-
Locate the selection for the shared desktop on your Ubuntu machine.
-
Click on the name of the shared desktop and then click the Share Screen button.
-
You should be presented with a dialog box requesting the password required to access the remote desktop on Ubuntu from the Mac.
-
Enter the password to establish the remote desktop connection to Ubuntu from Mac.
You may run into compatibility issues because macOS does not support encrypted VNC connections. To resolve this issue, enter this Linux command on your Ubuntu machine:
$ gsettings set org.gnome.Vino require-encryption false
This lack of encryption support by macOS Screen Sharing may limit your ability to use the connection effectively. Using this configuration, you should only transfer sensitive data over a secure network to limit the possibility of unencrypted data being intercepted by malicious actors.
Connecting an Ubuntu remote client to a Windows remote desktop

-
Step 1: Enable Windows Remote Desktop Connections on the Windows machine that will serve as the host for the shared remote desktop.
To do this:
• Open Control Panel.
• Select System and Security.
• Click Allow remote access below the System section.
• Below the Remote Desktop section, enable Allow remote connections to this computer.
• Click Apply and then OK.
-
Step 2: Download and install remote desktop client software on the Ubuntu machine.
The Windows host will provide the shared desktop that you will access from Ubuntu as a remote client. We like the Remmina Remote Desktop Client as it works well with the Windows Remote Desktop tools when configuring remote desktop connectivity from Ubuntu to Windows. Use the following procedure to install Remmina.

• Log into your Ubuntu system as an administrator or with an id that has permission to install software.
• Open the Ubuntu Software Center and type remote desktop in the search box.
• Select the Remmina Remote Desktop Client and click the Install button.
• An Authenticate box will appear in which you will be required to enter your Ubuntu password.
• Click the Authenticate button on the bottom right
• Allow the installation to complete before proceeding.
-
Step 3: Configure the remote desktop from Ubuntu to Windows.
The following steps will enable you to access the Windows remote desktop from Ubuntu:
• Launch Remmina on the Ubuntu machine.
• Click the Create a new remote desktop file button located on the top-left part of the screen. From here we will enter the credentials that permit access from Ubuntu to the Windows remote desktop.
• Open the Remote Desktop Preference screen.
• In the Profile section, enter the name you will use for connecting to the Windows remote desktop from Ubuntu.
• Select RDP-Remote Desktop Protocol in the Protocol section.
• Click the Basic tab and in the Server field enter the IP address of the remote Windows computer.

• Enter the Username and Password of the user account on the Windows machine under which Remote Desktop Connections are enabled.
• Configure your preferred resolution for the remote connection. The default may be sufficient for your needs and increasing resolution or color depth can result in additional latency and slow down connectivity.
• Share folders on the Ubuntu system if you wish by accessing the Basic tab, enabling the Share folder option, and designating the folder you want to share.
• Advanced settings are also available that allow you to control the functionality of the Ubuntu remote desktop accessed from the Windows host.
• After modifying all settings and parameters click the Connect button on the bottom-right of the screen. This will begin to establish the connection immediately. If you wish, you can click the Save button and close the software to use the connection at a later time.
• Click OK and wait for the connection to be fully established. When the connection is closed, it will be saved so you can use it again without performing the configuration steps.
The steps above will enable you to remotely connect a Ubuntu computer acting as a client to a Windows host machine. Setting up remote desktop connectivity from Ubuntu to Windows gives you flexibility and enables you to run Windows applications remotely from a Linux box.
Setting up an Ubuntu remote desktop from Windows
You can also remote desktop to Ubuntu from Windows using several different methods. We will look at one that uses the Microsoft Remote Desktop Protocol (RDP) to enable communication between the systems.
First, several prerequisites must be met. You need to:
- • Enable port forwarding on the remote device’s router;
- • Get the IP address of the Ubuntu machine;
- • Install SSH on the Ubuntu box.
Once you have met the prerequisites, you can use RDP to remote desktop to Ubuntu from Windows. If not already installed, you need to get the xrdp tool operational on the Ubuntu box with the following two commands.
sudo apt install xrdp
sudo systemctl enable xrdp
-
Start rdp on the Windows machine.
-
Click on Remote Desktop Connection.
-
Input the IP address and Ubuntu username in the appropriate boxes. Save setting if you wish for future use.
-
Click the Connect button to establish the remote desktop session. Provide the Ubuntu username’s password when prompted.
You can now access and control your Ubuntu machine from your Windows computer.