Being a free user of the TeamViewer application, sooner or later, you will face the limitations of the free license.
When a TeamViewer error message indicates that your connection has been blocked after a timeout, advising you to wait before attempting to establish a free connection again, there are three primary strategies to address the problem. The first and most straightforward approach is to upgrade to and activate a paid TeamViewer license. Another method involves changing your TeamViewer ID. Alternatively, you might explore using a different free remote support software that is accessible at no charge for both commercial and personal use. Continue reading to discover more about each of these solutions.
If navigating through the complexities of license differences and available options seems daunting, you might want to explore an alternative remote support tool. HelpWire stands out as a viable, free alternative to TeamViewer, providing key functionalities for the efficient remote support of both Macs and PCs. Learn more.
Connection Timeout Limitation in the Free TeamViewer License
As users say, the free TeamViewer license may limit connections to remote devices in time. This results in forced disconnections, and you get TeamViewer timeout messages.
In other words, while you are connected to the TeamViewer server, you may find your session automatically disconnected if the server detects your usage to be excessive or more in line with commercial use. So you might rightfully ask: how do I fix a TeamViewer session timeout?
The easiest way to deal with this is to purchase a TeamViewer license that fits your needs best. Once you activate a paid license, you will have no time limits and no error messages should interrupt your TeamViewer connections.
However, a situation may arise where you receive the timeout message but are unable to immediately purchase a commercial license. In this case, you can try resetting the TeamViewer ID.
How to Change the TeamViewer ID
In order to connect using TeamViewer, you require a unique ID and password combination.
This identifier is generated automatically and assigned to your computer the first time TeamViewer connects to the server.
Simply restarting the application will not work if your connection has been blocked, it will keep timing out after 1 minute. By changing the ID, the computer will be seen as a new client by the server.
The message you get will depend on the version of TeamViewer in use.
For users of version 14, you will see a “TeamViewer trial” error alert message.
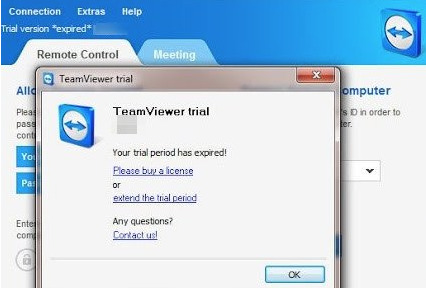
For version 15 users, you will be prompted to buy a license to continue.

You can not bypass this by reinstalling the software.
Change TeamViewer ID on Windows
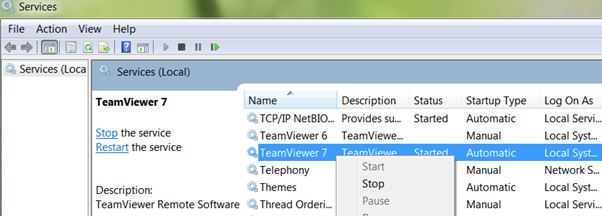
In order to change the TeamViewer ID on Windows machines, make sure the TeamViewer application is closed. Also, stop the service either by opening services.msc from the run command, or use net stop TeamViewer in your console.
-
Open regedit.exe
-
For Windows x86 users, go to the registry key
HKLM\SOFTWARE\TeamViewer\, locate REG_DWORD with the value ClientID -
Windows x64 users should find the
HKLM\SOFTWARE\Wow6432Node\TeamViewer; key then delete ClientID
-
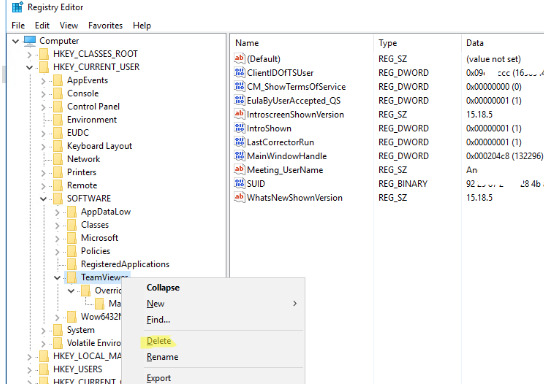
Delete the HKEY_CURRENT_USER\Software\TeamViewer registry key.
-
Enter the following command in the Windows Powershell with administrator rights.
Get-Item "C:\Program Files" | select Name,CreationTime -
Download the NirCMD tool to change the creation date of your Program Files folder. Then run the Command Prompt as administrator and run the following command:
nircmdc.exe setfilefoldertime "C:\Program Files" now now -
Now repeat step 5 to check if the change has taken effect.
-
Next, use one of the special tools available to change your network card’s MAC address. Alternatively, you can follow the steps below to edit your MAC address through the registry.
-
Use the following command in your command prompt to get the current MAC address.
Ipconfig /allThe two values of interest are (as per above example)
• Description (LAN card description) — Intel(R) 82574L Gigabit Network Connection;
• Physical Address (MAC address) — 00-0C-29-9D-4D-81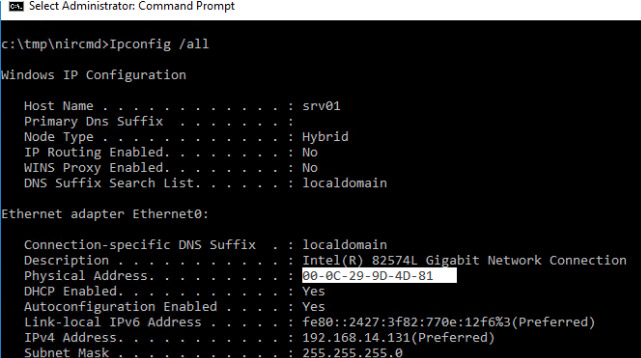
-
Now open the Registry Editor and go to the following key
HKLM\SYSTEM\CurrentControlSet\Control\Class\{4d36e972-e325-11ce-bfc1-08002be10318}Each network component is represented by a four-digit number. Find your network card in the registry key by looking for the correct DriverDesc value.
When you find the correct key, change the value of the REG_SZ parameter named “NetworkAdress”. You can just alter one character in the current MAC address.

-
Download and extract VolumeIDv2.1 to change the VolumeID or unique identifier of your system partition
-
Open the command prompt with administrator rights and check your current VolumeID by simply typing
Vol In this example, the current volume is 5E37-ECE1. Change it to 5E37-EC11 using the following
Cd c:\users\root\Downloads\VolumeIDVolumeid.exe c: 5E37-EC11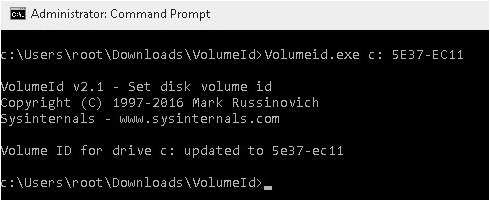
-
Now close the command prompt and reboot your machine. Then relaunch TeamViewer and you will be assigned a new TeamViewer ID.
Change TeamViewer ID on Linux
For Debian 9 users, follow these steps:
- Uninstall TeamViewer with su privileges
- If the /var/lib/dbus/machine-id file exists, remove it.
- Edit the GUID (you can just change the last character)
mc -e id.txt - Change the MAC address of your network card using the following commands:
ifconfig eth0 downifconfig eth0 hw ether New_MAC_HEREifconfig eth0 upnano /etc/network/interfaces - Correct string:
pre-up ifconfig eth0 hw ether New_MAC_HERE

6. Reboot the OS
7. Install TeamViewer again, you should now get a new ClientID
Linux Mint distro users can follow these steps:
- Delete TeamViewer
sudo dpkg -r teamviewer - Remove the binding file if it exists
sudo rm /var/lib/dbus/machine-id - Change the NIC’s MAC address
- Reinstall TeamViewer
sudo dpkg -i teamviewer_13.2.13582_amd64.deb - If you experience any error with missing packages, run the following command:
sudo apt-get install -f
For cloned Linux machines:
- Stop the TeamViewer daemon
systemctl stop teamviewerd - Delete TeamViewer settings:
rm -r ~/.teamviewer - Remove folder /opt/teamviewer{TW_VERSION_Here)/config;
- Start the TeamViewer daemon
Change TeamViewer ID on Mac OS
Mac users can use a python script available on GitHub
- Download the script
- Close TeamViewer completely (make sure it’s not still running in processes)
- Run the downloaded script
sudo ./TeamViewer-id-changer.py - Reboot your device
Connection Timeout Issue With a Paid TeamViewer License
As you already know, a message about the license limit for the maximum session duration is created to show up for the users of a free TeamViewer license.
At the same time, it may happen that this error message appears in the software after the purchase of a TeamViewer corporate license.
What is the reason? As many users assume, this may be the case if the paid version of TeamViewer hasn’t been activated correctly.
Each paid version has its own activation instructions that you can find on the TeamViewer website.
Once you make sure your license is activated, the issue should be resolved. If the problem persists, it’s recommended to reach out to TeamViewer’s customer support for professional assistance.
Choose a Reliable Alternative to TeamViewer
Instead of wasting time troubleshooting blocked connection issues with TeamViewer, switch to HelpWire — a free, easy-to-use alternative with no hidden costs.
HelpWire offers unlimited session time, an intuitive interface, and supports both on-demand and unattended remote access. You can start remote support sessions in just a few clicks, without any complicated setup or configuration. Plus, HelpWire is fully cross-platform, making it easy to connect across Windows, macOS, and Linux.
Key HelpWire features:
- ✅ Quick Session Start – Instantly connect to clients via secure links.
- ✅ Multi-Monitor Remote Access – View and control multiple remote screens.
- ✅ Unattended Access – Manage devices without user presence.
- ✅ Seamless File Transfers – Copy and paste files easily during sessions.
- ✅ Team & Client Management – Track sessions, organize clients, assign roles.
- ✅ Collaborative Chat – Chat and coordinate with other agents in real time.
Explore the full list of HelpWire features or see for yourself why it’s the best alternative to TeamViewer.
Final Thoughts
We earnestly hope this article has alleviated your concerns regarding TeamViewer. With a comprehensive array of solutions now in your arsenal, you’re better equipped and ready to effectively manage these challenges.
Frequently Asked Questions
Officially, the free and latest paid versions of the software do not have a certain connection or session time limitation.
Although the software providers don’t claim any free license time limitations, some of the users mention that the TeamViewer session timeout is after 30 seconds, while others say that TeamViewer disconnects after 1 minute. Also, there are cases when the connection can be active for up to 5 minutes.
Today, TeamViewer lets you choose a license to meet your personal or business requirements. They offer a free license for personal use and paid options well suited for commercial organizations.
You can get the license that is right for you and change it whenever you wish. Depending on your license type the user experience will differ.
When using the free version of the software your access is regulated by the free license it comes with.