How to Record TeamViewer Sessions: 3 Proven Methods
TeamViewer screen recording is useful for documentation purposes or you can keep the recording for future reference and follow the instructions to resolve certain issues all by yourself. So, if you are wondering how to record sessions using TeamViewer, you can do it in many ways.
You can record sessions using TeamViewer’s built-in screen recording functionality or via a third-party tool. In this article, we’ll discuss different ways to record TeamViewer sessions, the benefits of each method, and the steps to do it.
Method 1: TeamViewer Screen Recording with Native Recording Function
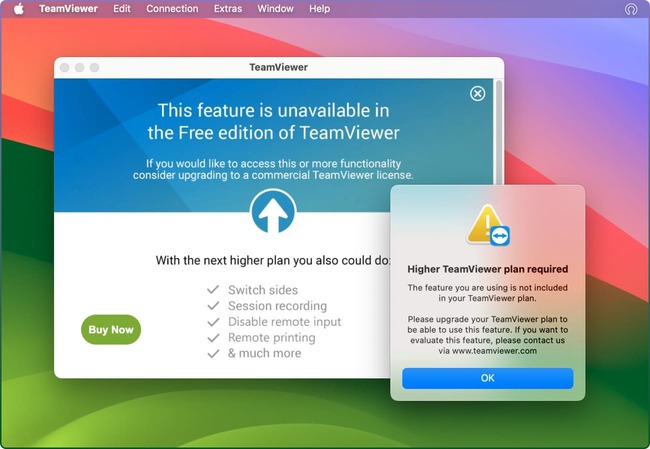
Note: The screen recording feature is not available in the free version of TeamViewer. You need to upgrade to a commercial license to access this feature. Check out other limitations of the TeamViewer free version.
On Windows
-
Connect TeamViewer to another system or computer. Go to the toolbar of the remote control and locate the menu “Files & Extras”.
-
Choose the option “Start Session Recording”.
-
Once the session recording ends, you will see a prompt that allows you to save the recording. Now, save the screen recording.
On macOS
Make sure to give the required permissions before you start TeamViewer Mac screen recording. This is a crucial thing to do because recording sessions is not possible without enabling permissions.
So, let’s understand the step-by-step process of how to give access permissions for TeamViewer screen recording on Mac.
- Look for the Apple menu in your screen’s top left corner and click on it. Select “System Preferences.”
- Click on the option “Security & Privacy.”
- 3. Now scroll down and look for “Screen Recording” in the left sidebar. Click on it.
- 4. You will see a list of applications. Find TeamViewer and check the box beside it to enable TeamViewer Mac permissions for screen recording.
- 5. If the TeamViewer is still running, close it. Relaunch the app.
Once complete, follow the next steps:
1. After you have connected TeamViewer (Classic) with a device, find the “Extras” drop-down from the toolbar. When you hover over the option “Record”, you will see a list with “Start” on it. Choose it. It will initiate the screen recording.
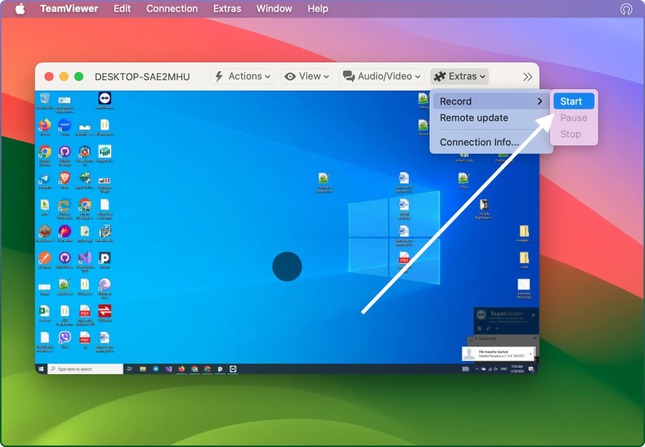
2. After the recording is done, you will see a prompt to save the recording. You can rename it and choose the file location where you want to save it. Hit “Save”.
Method 2: Automatically Recording TeamViewer Meetings
TeamViewer allows screen recording on Mac automatically so that users can easily record remote control sessions and meetings without human interference. On configuring the required settings, the recording will automatically start when a meeting or remote control starts.
Here are the steps to automate the recording process:
On Windows
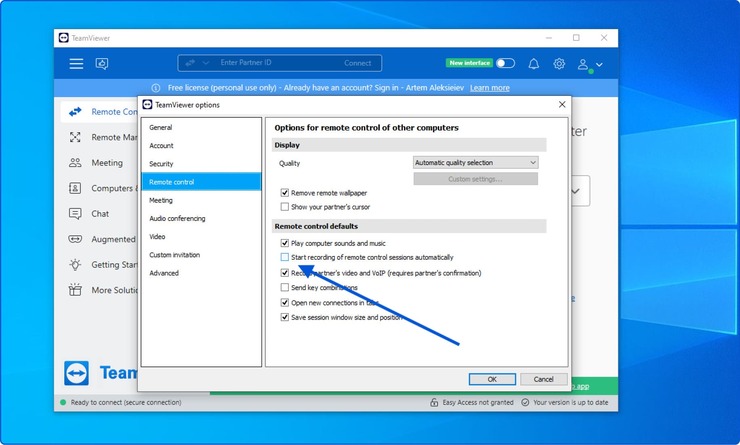
- In TeamViewer (Classic), there will be a Gear icon (⚙) located in the upper right corner.
- Go to Remote Control.
- Click on the “OK” button to save the changes.
On macOS
- From the top menu bar, find TeamViewer and click on it.
- It will have a drop-down menu. Find “Preferences” and choose it.
- Choose “Remote Control”.
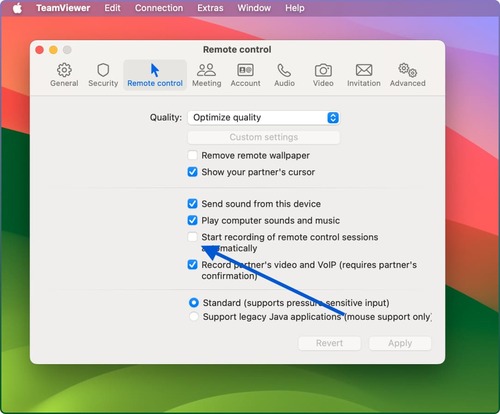
- You will find the option “Start recording of remote control sessions automatically” as shown below. Check the box beside that option.
- Hit “Apply” to save the changes.

Where Can You Find the Saved TeamViewer Recordings?
Are you wondering where TeamViewer recordings go? Don’t worry, you can find all your saved TeamViewer recordings inside a folder on the local computer. TeamViewer stores recorded sessions and meetings in a computer’s “Document” folder, by default.
Let’s take a look at the path where TeamViewer recordings will be saved on your local system.
How to Configure the TeamViewer Recording Directory
You can assign a particular folder to save all the TeamViewer screen recordings. This will automatically save each recording when the session ends or the recording stops.
Device Name (Device ID)_[YYYY-MM-DD] [HH.MM]
You can enable this functionality by following the below steps:
- In TeamViewer’s upper right corner, click on the Gear icon (⚙);
- Go to “Advanced”;
- Scroll down to view different TeamViewer (Classic) options;
- You will see a text box where you can fill in your preferred folder path to save the recording;
- Once filled, click on “OK” to save the changes.
Method 3: Record TeamViewer Sessions Using a Third-party Application
Apart from TeamViewer’s native screen recording feature, there are many third-party applications available that you can use to record remote sessions in TeamViewer. These external applications offer useful features, advanced options, and flexibility so you can perform effortless TeamViewer screen recordings.
Let’s check out some of the best third-party software to enable TeamViewer recording of meetings and sessions.
OBS Studio
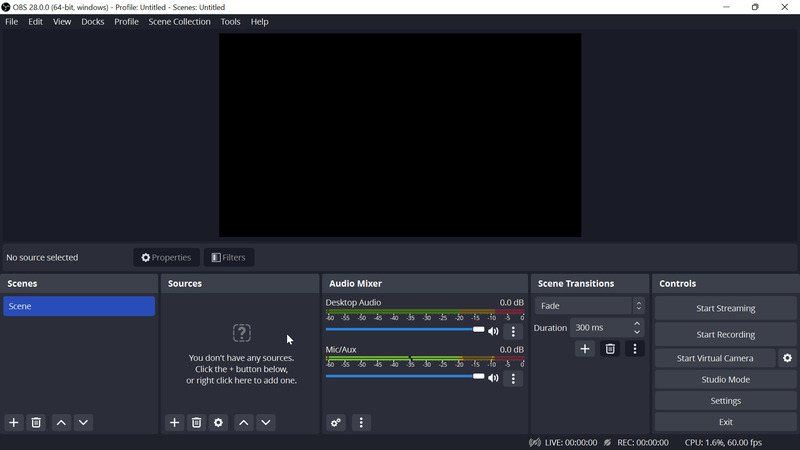
If you are looking for an advanced TeamViewer screen recording software that can capture both audio and video, try OBS Studio. This powerful open-source software is preferred by many due to its features, ease of use, and smooth recording experience.
You can customize OBS Studio to a great extent and enable live streaming through it. Here are some of the simple and quick steps to record sessions on TeamViewer with audio via OBS Studio:
- Open the TeamViewer app and connect it with a remote user to start a session.
- In the background, launch OBS Studio and add the option “Application Audio Capture (BETA)” to the list of sources.
- Once you have set up the sound settings, go to “Start Recording” in the menu “Controls”.
- After the session or meeting ends, click on “Stop Recording”.
Aiseesoft Screen Recorder
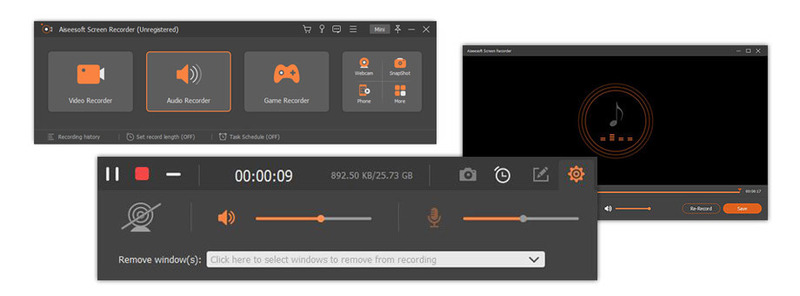
Another TeamViewer recorder you can consider using is Aiseesoft Screen Recorder. It can capture all activities displayed on your local screen, including video and music. You can use these recordings for providing video tutorials, training, etc.
In addition, the software offers greater customizable controls so you can effortlessly manage the recording modes, quality, hotkeys, output format, and more. Here’s how you can use it for screen recordings.
- Download Aiseesoft Screen Recorder and choose Video Recorder.
- Configure recording settings:
- • Choose recording region: You can either choose “Full” or “Custom” to select your preferred region to record the screen. With “Full”, you can select the complete screen to record the session. With “Custom”, you can choose a customized region in your local screen to record the session even if TeamViewer is opened in full screen.
• Choose recording audio: Toggle on your System Sound or Microphone or both to record audio from your local computer as well as your remote computer.
Furthermore, Aiseesoft Screen Recorder provides easy controls for changing screen recording quality, hotkeys, output format, and more by clicking on the gear icon. You can find this icon above the Microphone. - Record a TeamViewer remote session and edit it: When everything is going well, initiate a remote connection through TeamViewer. Next, click on the button “REC ” to start recording the session.
- Play the TeamViewer recording and save it: You can open the preview window through the “stop” button, which you can find in the float bar. This functionality lets you directly play the captured recording file before you export it.
Using the Clip feature, you can eliminate unwanted sections. Once everything is set, go ahead and click on the “Save” button and choose your preferred path to save the recording on your computer.
Source: aiseesoft.com
AnyRec Screen Recorder
If you are looking for an all-in-one TeamViewer recording tool for Mac and Windows, try AnyRec Screen Recorder. It allows you to capture TeamViewer sessions along with webcam footage, audio files, etc. with its original quality.
Moreover, you can record remote sessions easily without any notifications. It also provides scheduled recording so you can automatically record videos.
- Open the AnyRec Screen Recorder app: Start by opening the recorder on your local computer.
- Choose Recording Area: Click on the option “Video Recorder” and select either the complete screen or a custom section on the screen in a TeamViewer session.
- Configure Audio Settings: Turn on “System Sound” to capture audio in a TeamViewer session. Turn on “Microphone” to capture audio. It’s also possible to improve audio quality during session recording.
- Start recording: To start recording, you need to click on the “REC” button showing on the screen before you start a TeamViewer session.
- Include annotations: TeamViewer lets you include annotations, callouts, lines, arrows, and more during the recording of the session to focus on essential points or create notes while you continue with your session.
- Stop recording and save it: Once you complete recording a TeamViewer session, click on “Stop” and save the ongoing recording in the format you prefer. Before saving the recording on your PC, you can view it, trim unnecessary parts or bluffs, and perform edit operations wherever needed.

Source: anyrec.io
Conclusion
TeamViewer records meetings with audio and video with its native screen recording function useful for analyzing and reviewing webinars, online meetings, remote sessions, online classes, and more.
Depending upon your software supportability, security constraints, and preferences, you can choose from built-in TeamViewer screen recording or a third-party screen recorder like Aiseesoft Screen Recorder, Anyrec, or OBS Studio.
This article provides a detailed explanation of native TeamViewer screen recording functionality and how you can use it step by step on Mac and Windows.