How to Perform File Transfer Using TeamViewer
Often you need constant access to data stored in different devices and locations. You may also need to transfer files to and from devices that can be located on-premises or remotely. TeamViewer is a leading remote access and support solution that you can use for transferring your data and files between two systems.
In this article, you will learn how to do TeamViewer file transfers with the help of several methods. In addition, we’ll discuss TeamViewer’s security measures and size limits for file transfers.
5 Ways to Transfer Files Using TeamViewer
We’ll discuss each TeamViewer file transfer technique step-wise, from the TeamViewer File Box utility to the simple drag-and-drop method and convenient chat-based file transfers.
There is a File Transfer window that allows you to send or receive files easily. You can open this window in two ways:
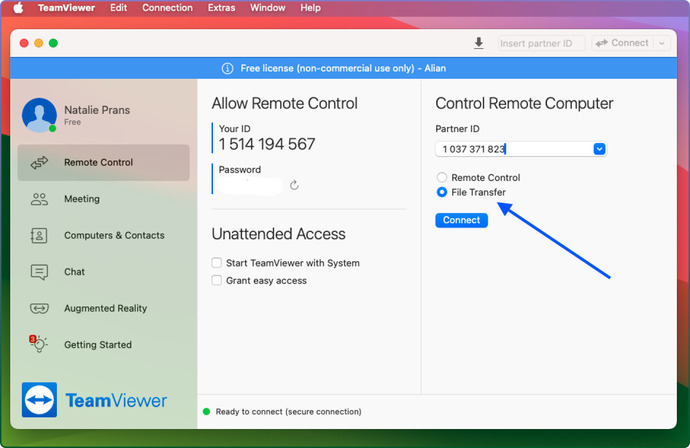
- • Before you start the connection, choose the option “File Transfer” on the device’s Remote Control tab.
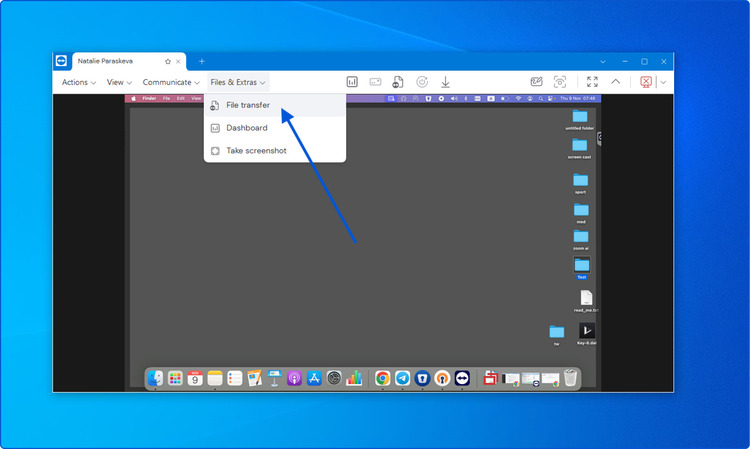
- • Click on “Files & Extras” in an ongoing remote session. From the Remote Control window’s toolbar open file transfer.
Now, let’s talk about each file transfer method that TeamViewer supports one by one.
Method 1: Using the File Transfer Mode in TeamViewer
TeamViewer has the File Transfer Mode through which you can transfer your files. Here are the steps to do that.
-
Open the TeamViewer software.
-
Go to the tab Remote Control.
-
Above the field “Partner ID” in the drop-down menu, you will find “File Transfer”. Choose this option.
-
Enter the remote device’s alias or Partner ID. click on the “Connect” button.
-
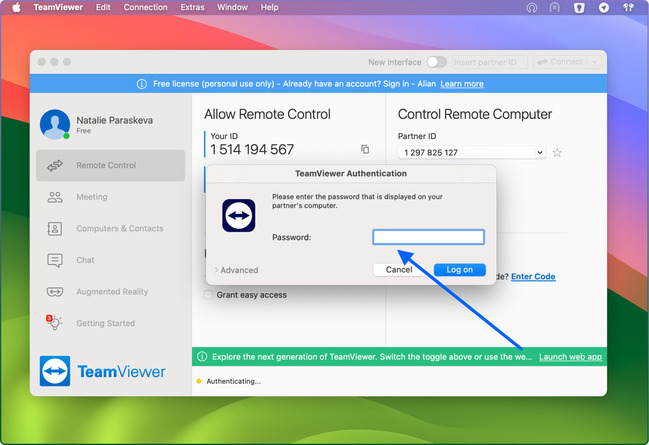
Now, you will see a prompt asking for a password based on how you have done your setup. The password may be displayed on the partner’s computer. After entering the password, click on the button “Log On”.
-
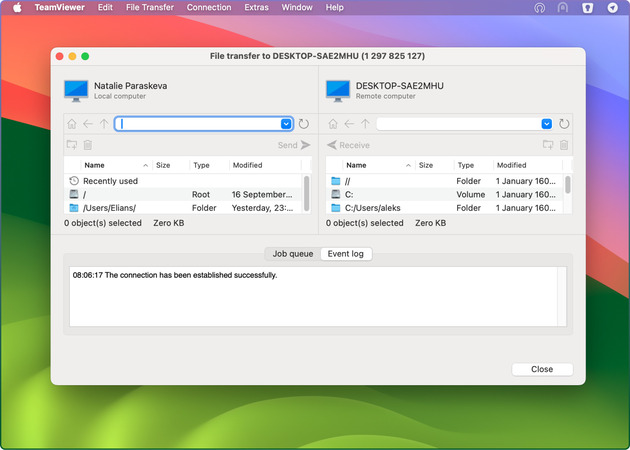
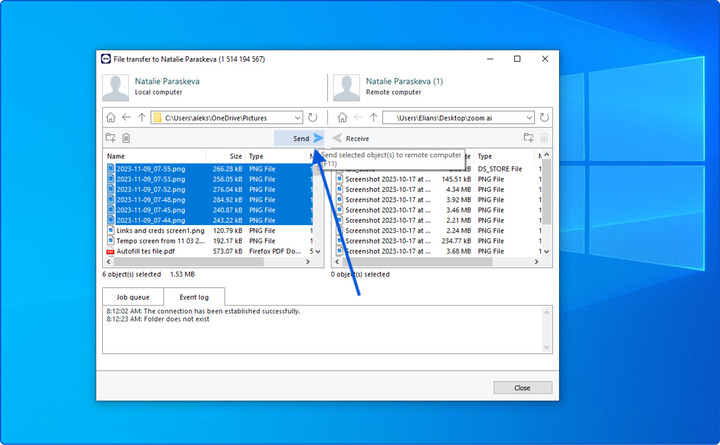
To enable file transfer from your local computer to a remote computer, choose the targeted file that you can find on the left. Now, click on the right arrow button.
Alternatively, you can choose the file from the right and click on the left arrow button in order to transfer your file from a remote system to your local system.
-
Close the window once you have completed transferring the file by clicking on the “Close button”.
Hint: It’s also possible to transfer folders and files from one computer to another using the Drag-and-Drop option in the File Transfer window. To do this, just drag the folder or file you want to transfer from the area of one file system to the area of another file system.
Method 2: File Transfer During an Ongoing Remote Control Session
In an ongoing remote control session, you can transfer files in TeamViewer by following the below instructions:
-
Initiate a new remote control session by using the partner computer’s TeamViewer password and ID to connect to it.
-
Click on “Files & Extras” during an ongoing remote control session.
-
In the Remote Control window’s toolbar, open File Transfer. To initiate file transfer from your local computer to a remote one, select the desired file located on the left. Next, click the right arrow button.
Method 3: Using Drag and Drop Feature to Transfer Files
Another option to transfer files from a local computer to a remote computer is by using the drag-and-drop feature in TeamViewer. Apart from enabling file transfer, this feature also allows you to drag files and drop them into an app. This is useful in many instances like when attaching files to an email.
This file transfer method is a functionality of the Remote Control connection mode and doesn’t work as a standalone mode.
So, if you want to use the drag-and-drop feature to transfer files in TeamViewer, follow the below steps:
-
Start a remote session using the remote computer’s TeamViewer password and ID.
-
Choose the file(s) you want to transfer.
-
Drag your file from the local computer screen directly to the Remote Control window. And Voila, your file will be transferred to the destined remote computer!
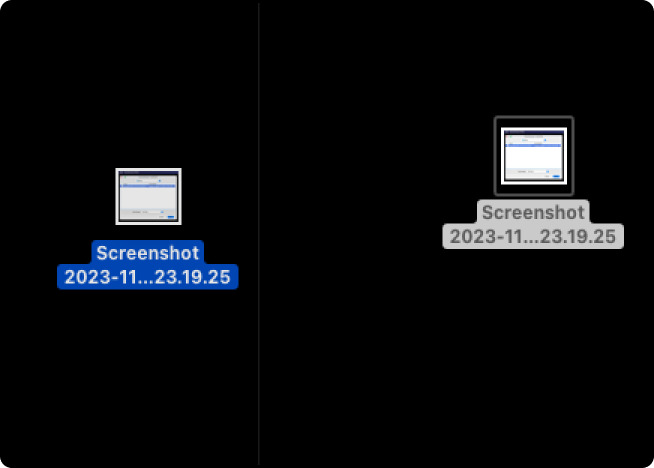
If you want to perform a file transfer from a remote system to a local system, the same process must be followed.
Method 4: Transfer Files via the Context Menu
The Windows context menu provides a way for you to transfer files between a remote computer and a local computer. For this, you will need to send your files via TeamViewer using the context menu to your contacts or computers from the device’s “Computers & Contacts” list.
Here are the steps to transfer files via TeamViewer with the help of the Windows context menu.
-
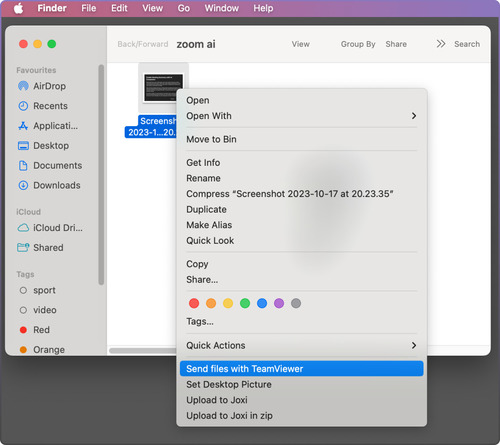
Right-click on a file. It will open the context menu.
-
Choose the “Send to” option in TeamViewer.
-
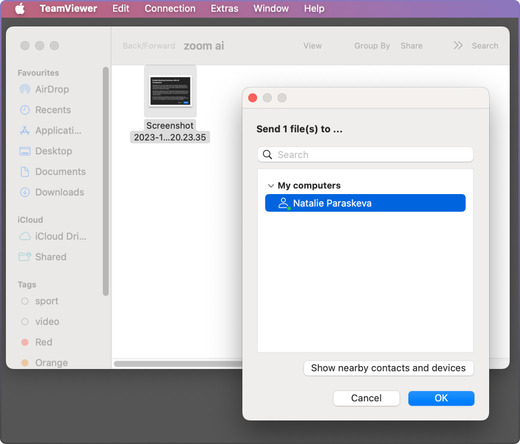
You will see that a dialog box has opened with the name “TeamViewer Send file to…”. Choose the contact or computer to which you want to transfer the chosen file.
-
Click on the button OK. Ensure that the contact or computer confirms this file transfer request.
-
The file will be sent to a contact or computer from your list “Computers & Contacts”.
The recipient has to confirm the file transfer request. Finally, the file will be saved on the contact device or computer in its Download folder under this – C:\Users\%username%\Downloads.
Hint: You can also call this function through the list Computers & Contacts. Just click on the icon in a contact’s context menu and choose the file you wish to send.
Method 5: Using File Box in TeamViewer
It’s possible for participants to share files among themselves using TeamViewer’s File Box widget.
-
In order to open File Box in an ongoing session, click on Files & Extras. In the Remote Control window, click on “Share via file box ”.
-
For this, you can drag the target file and drop it into the File Box widget. Alternatively, you can choose a file by clicking on the icon via the dialog box Windows Open.
-
After sharing the file, open the file or the folder where it is stored by clicking on the icon located next to that file and choosing the targeted option from the Windows context menu. On the partner computer or remote system, the file you have shared will appear in the File Box widget. You can download this file by clicking on the icon.
-
In order to remove the file, choose the option “Remove” from the File Box widget in the Windows context menu.
Transfer Files from Cloud Storage
Apart from files from your computer, you can share files from multiple cloud storage services through the File Box widget with your connection partners.
For example, you can share the same files or data repeatedly with participants in a meeting using this function without reloading it each time into the File Box widget.
TeamViewer supports the following cloud services for file transfer:
- • Google Drive
- • Dropbox
- • Box
- • OneDrive/OneDrive for Business
How Fast Is File Transfer in TeamViewer?
TeamViewer’s development team is constantly making changes to improve the software. In its new version, TeamViewer allows you to transfer files up to 20x faster than what it did previously. Its file transfer speed can reach up to 200 MB/s via UDP only.
These facts show some serious enhancements in speed. TeamViewer has achieved this speed by optimizing different technical file properties, for instance, its compression ratio.
However, the exact speed and performance you can obtain depends largely on factors like your current situation and setup. Some of these circumstances include:
- • The speed of internet connection on both the sender and receiver
- • The current load on the server
- • The routing and distance between the two connected devices
- • Factors affecting the network connection like network restrictions, software systems, firewalls, etc.
Is TeamViewer Safe for File Transfers?
TeamViewer provides superior file transfer protection. Its security features include AES 256-bit encryption, RSA private/public key exchange, and RSA 2048. It also abides by the latest security standards.
Through end-to-end data encryption, TeamViewer ensures that all the files you share with your colleagues, customers, or partners go to them only and are not intercepted by unauthorized entities.
However, like any other software, TeamViewer’s security depends on different factors, including:
- • Antivirus and firewalls: Although TeamViewer is compatible with most antivirus software and firewalls, you must ensure no vulnerabilities are there in the security software you are using on your local computer. Also, keep them up-to-date to avoid security loopholes.
- • Authentication: When you initiate a connection in TeamViewer, it will generate a unique session password and ID. Ensure to share these credentials only with individuals that you genuinely trust. In addition, set your personal password to enable unattended remote access. However, it’s essential to create a unique, strong password that no one can easily guess.
- • Two-Factor Authentication (2FA): For each user account, TeamViewer offers two-factor authentication (2FA) to enable an added layer of security. This makes it difficult for unauthorized users to infiltrate accounts and gain access.
- • End-to-end encryption: TeamViewer offers end-to-end encryption for connections and file transfers. On the source computer, it encrypts data that is being transferred and decrypts only at the destination system. Thus, no one can intercept this data or read it.
- • Updates: TeamViewer releases updates frequently to fix all the known vulnerabilities and enhance security. Thus, it’s essential for you to update the software’s version to the latest.
- • Activity logs: TeamViewer logs activities in its systems such as file transfers and other transactions. Monitoring the logs on a frequent basis helps you detect suspicious activities and prevent risks.
- • Whitelisting: TeamViewer offers a whitelist option or allowlist option to specific accounts and IDs. This ensures users on this list can only connect to the device and access information.
Exercise caution: Although TeamViewer offers powerful security features, it’s important to stay cautious while using the internet. There are many scams around remote software such as TeamViewer. So, beware of anyone seeking access to your device or data or unfamiliar persons trying to connect with you.
How Big of a File Can TeamViewer Transfer?
TeamViewer file transfer size limit is not defined. Thus, you can transfer files of varying sizes with TeamViewer.
However, the reliability and speed of file transfer can depend on various factors like the TeamViewer version you are currently using and your internet connection. Obviously, larger files might take longer to get transferred than smaller files. If your connectivity is stable or poor, some issues in file transfer can also arise.
Best TeamViewer File Transfer Alternative
If you want to enable safer and faster file transfer, HelpWire is an excellent option. It offers a simpler way of connecting the source and destination computers and starting the file transfer process as compared to TeamViewer.
You can establish a remote connection quite easily in a few clicks and start transferring files between two devices. Just copy the target files and paste them to a remote computer directly. This will eliminate the need for intermediate file hosting or storage services.
Moreover, HelpWire is cross-platform compatible, which is one of its key strengths. Thus, you can easily share files from one system to another which can be Windows or Mac. In addition, HelpWire’s file transfer speed is superfast to save you time.
Apart from performance, HelpWire offers advanced security with end-to-end encryption. This helps protect your shared information and prevents bad actors or unauthorized access.A detailed comparison between TeamViewer and HelpWire might be helpful in coming to a decision.