Using Remote Desktop over the Internet: Definitive How-to Guide
- HelpWire
- →
- Blog
- →
- Definitive Guide to using Microsoft Remote Desktop
- →
- Using Remote Desktop over the Internet: Definitive How-to Guide
To enable Windows Remote Desktop over the Internet you can either set up a Virtual Private Network (VPN) or you can configure your router to accept requests from a specific port, and that data is in turn forwarded to a specific private IP address.
Want to skip complex steps to configure a VPN or router forwarding?
Looking for an easy yet secure way to access a remote desktop over the internet?
Check out this section about HelpWire to know how.
First Things First: Enable RDP
The universal and the very first step to accessing a remote computer with RDP over the Internet is to make sure Remote Desktop is enabled on the remote computer. We’ve already described the detailed steps for configuring Remote Desktop Connection on Windows, and you can check it out for some comprehensive instructions, but in terms of this guide, you should not need to dig deep.
- • On the remote computer, go to “Settings” > “System” > “Remote Desktop.”
- • Turn on “Enable Remote Desktop.”
Option A: Configure VPN
Using a Virtual Private Network (VPN) provides a secure way to share your desktop without the risk of exposing your computer to the Internet. A VPN creates a secure tunnel between your local computer and the VPN server, making it possible for the RDP server to connect with the client as if they were a part of the same local network.
No matter where you are located if you connect to the VPN, you will have reliable and secure access to the Remote Desktop and any other remote services not normally available outside the local network.
How to Create a VPN Connection
If you want to learn more about this, check out our article on How to Choose The Best VPN Protocol which covers VPNs in great detail.
Use the integrated VPN service if your computer has Windows 10 or 11. For connection, you will this information:
- • The address/name of the VPN server.
- • The VPN protocol type (PPTP, L2TP/IPSec, OpenVPN, SSTP, IKEv2).
- • Login details like the username and password.
How to Add a VPN Connection in Windows
-
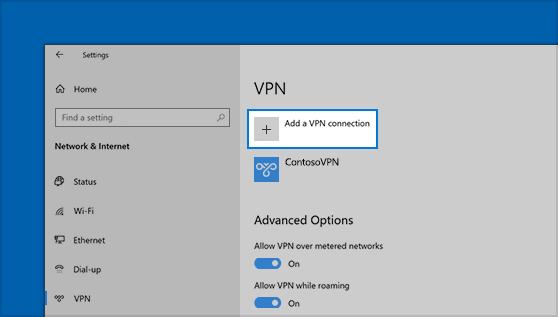
Open Windows Settings.
-
Go to “Network & Internet” > “VPN”.
-
Click the “Add a VPN connection” option.
-
Enter all the required information (VPN provider, server address/name, VPN type, type of sign-in info, user name, and password) and hit “Save”.
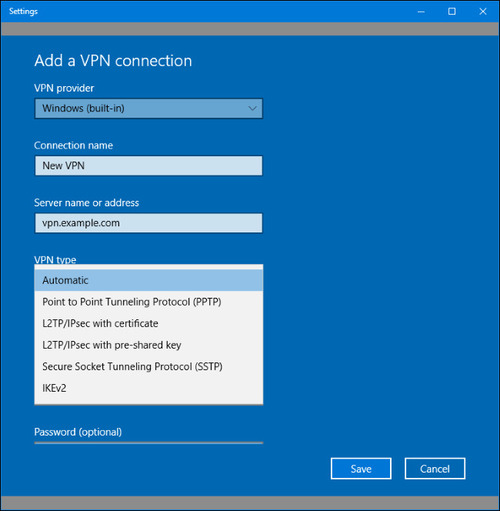
Your new connection will be added to the list of available connections.
Option B: Router Port Forwarding
If for whatever reason you can not use a VPN, you can opt to make your Remote Desktop Server directly accessible on the Internet. This is achieved by configuring your router to forward all Remote Desktop traffic to the PC from which the server is being accessed.
Opening remote desktop ports comes with security trade-offs that you must be aware of. Since the connection is open to the Internet, the risk of attacks is much higher. Hackers are always searching for remote desktop security weak points like open TCP ports commonly used with Remote Desktop connections.
Ensure that security software is installed and up to date to patch any known vulnerabilities. Make use of strong passwords and ensure your network is secured with a firewall.
How to Configure a Static IP
By default, computers are assigned a dynamic IP address from the DHCP server. A dynamic IP changes each time a computer reconnects. If you want to configure your router for port forwarding, it is advisable to set a static IP for your computer. This will save you from having to keep changing your router settings.
If your router has an option to make your current TCP/IP configuration static, consult the manufacturer’s website for details on how to do this.
To Create a Static IP, Follow These Steps:
1. Open the Control Panel.
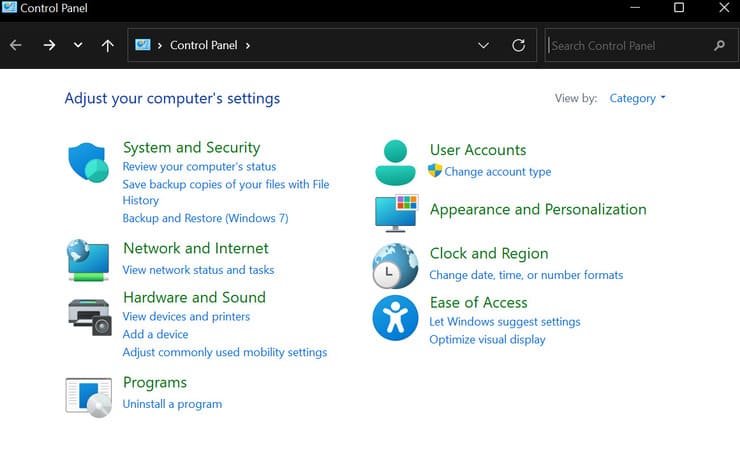
2. Go to “Network and Internet” > “Network and Sharing Center”.
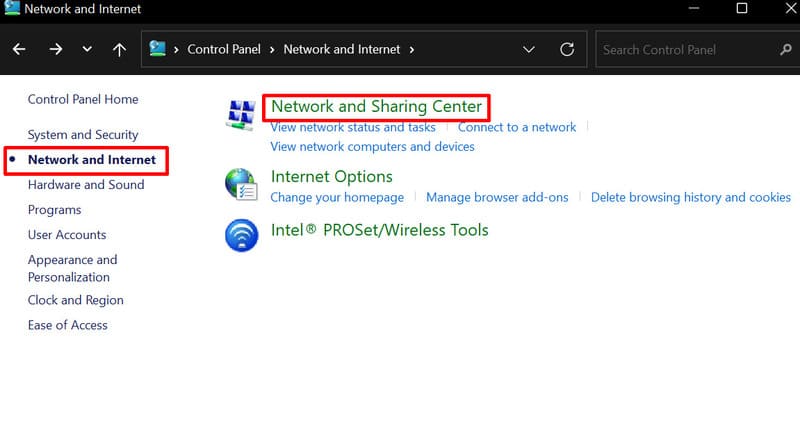
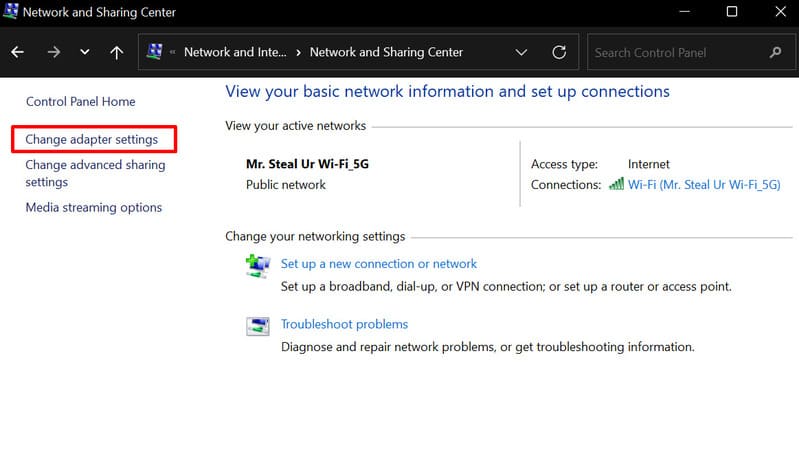
3. From the sidebar, select “Change adapter settings”.
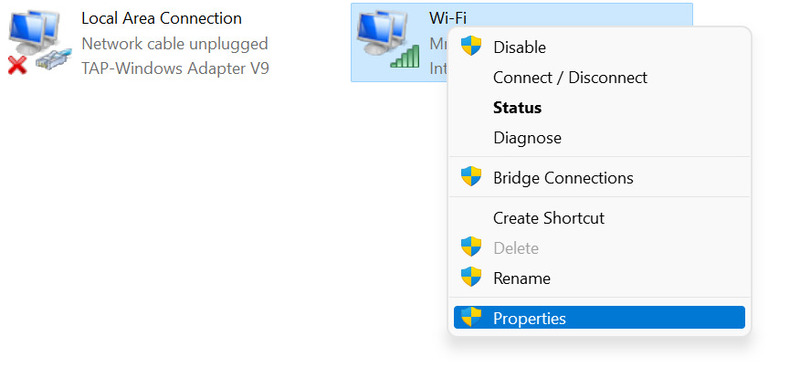
4. Open the context menu by right-clicking the active adapter, and select its properties.
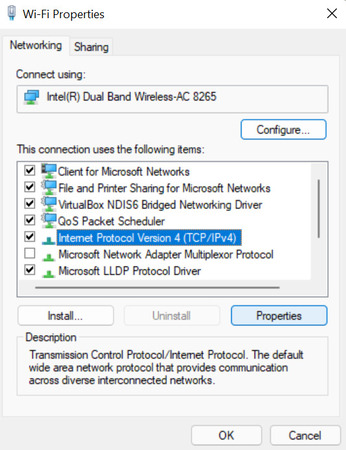
5. Select Internet Protocol Version 4 (TCP/IPv4) from the list and click the Properties button.
6. Click on the General tab and select the “Use the following IP address” radio option.
7. Enter a valid IP address in the field. Make sure it’s outside the local DHCP IP range to avoid any IP conflicts with existing computers on the network.
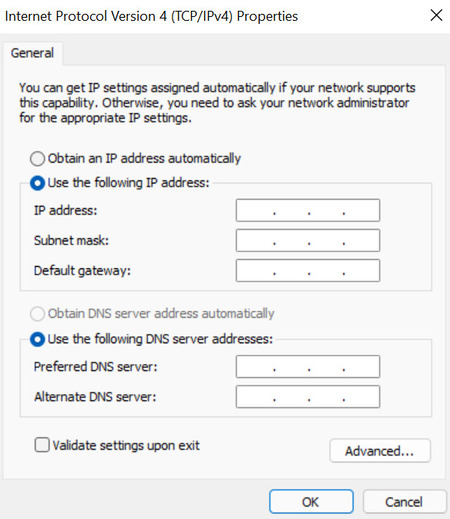
8. A subnet mask is usually auto-populated based on the IP address you enter. If this is incorrect, you can change it if needed.
9. Make sure the Default gateway is configured correctly. This is the address of the router.
10. In the “Use the following DNS server addresses” section, add your DNS server in the “Preferred DNS server” field.
11. Click OK, then Close to complete the process. Your changes will take effect immediately.
How to Determine Your Network Public IP Address
Apart from your local computer IP address, you need to know the public IP address of the remote network to connect to the remote device. You can determine the IP address by following these simple steps
- Open your web browser
- Using your preferred search engine, type in “What’s my IP address”.
- When you press enter your IP will be displayed on the screen.
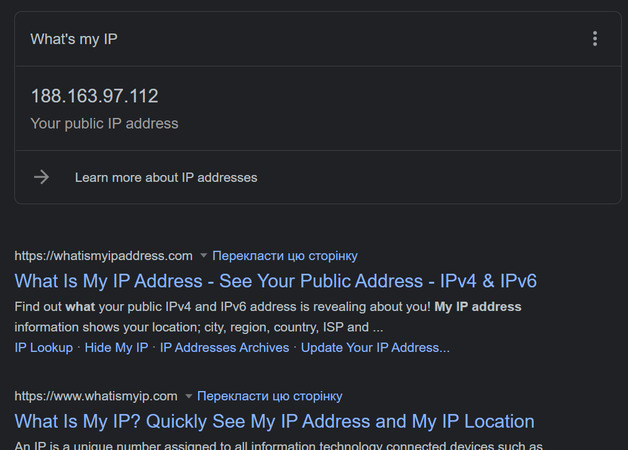
Sometimes an ISP may offer a dynamic public IP address which means your public IP address may change. If this is a problem you can use the “Dynamic Domain Name System” (DDNS) services which will track and identify public IP changes. Some of these services include DynDNS, OpenDNS, No-IP, etc. You can also request a static IP address from your service provider, but this may incur additional costs.
Configuring Your Router for Port Forwarding
To allow remote desktop connection over the Internet, you must forward the default TCP port 3389 on your router to allow remote connections. Note that the instructions depicted are for the Xiaomi Mi Router AX1800 and will likely differ from what you see. The routers’ user interface varies depending on the manufacturer or even the model of the device. However, you can use them as a reference when configuring your router. And do not forget to check the manufacturer’s documentation for more specific steps.
The Steps to Forward the Remote Desktop Port on Your Router are as Follows:
1. Open the Command Prompt.
2. Type ipconfig and press Enter. This will show the current TCP/IP configuration.
3. Make sure the “IPv4 Address” and “Default Gateway” fields are correct.
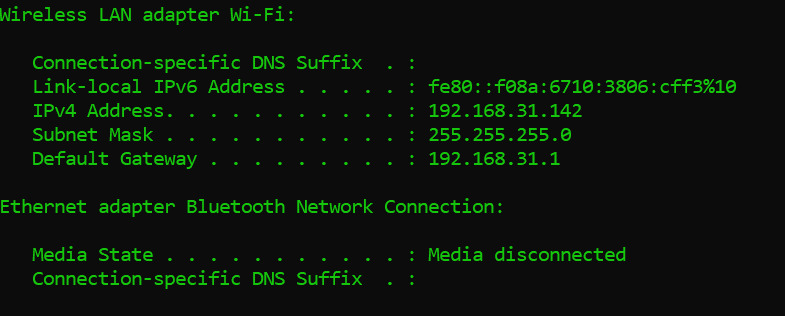
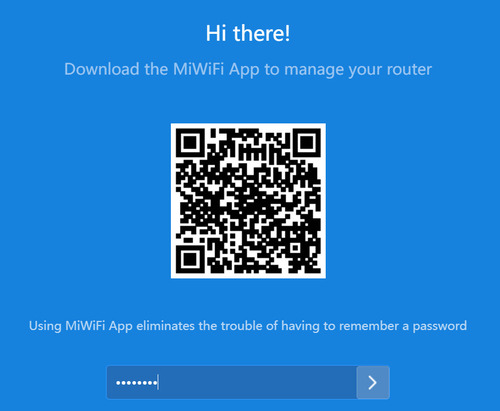
4. Open your preferred web browser and type in the IP address of the router (Default Gateway) into the address bar.

5. Enter your credentials in the login field(s) to sign in to your router admin panel. If it is a new router, the default username and password can usually be found on a sticker on the device.
6. Go to the Port Forwarding settings page.
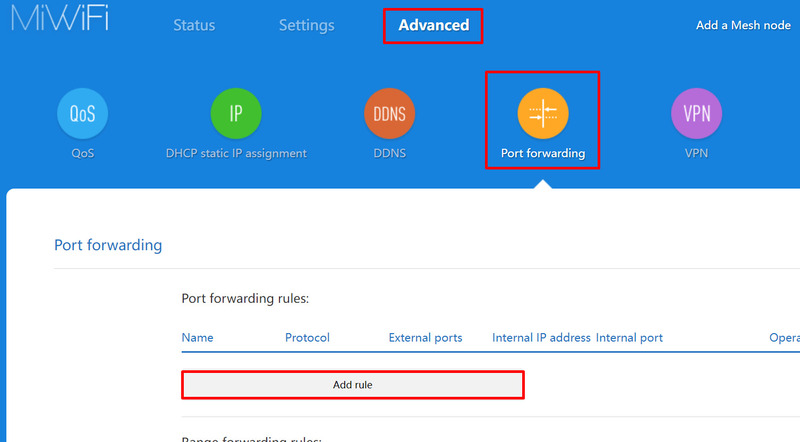
7. Enable the Port Forwarding service (if it’s not enabled).
8. Create a corresponding rule by selecting “Add rule”, and enter the following information:
- • The rule’s name
- • Protocol: TCP
- • External Port: 3389
- • Internal Port: 3389
- • Internal IP Address: Enter the IP address of the computer you want to connect to.
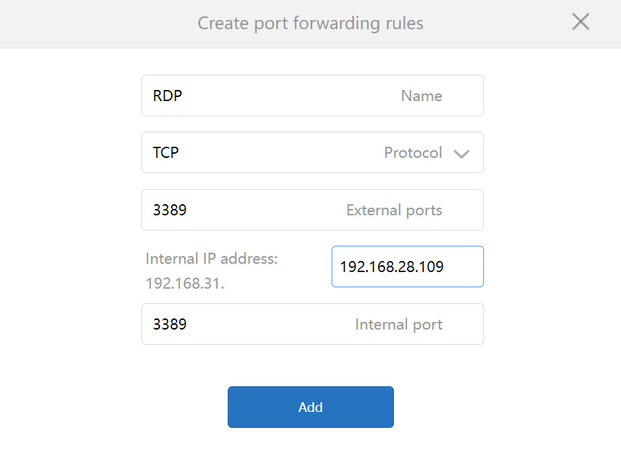
9. Click “Add” when you’re done. The port specified will be opened for remote desktop connections through the Internet.
Option C (That Should be A): HelpWire
For those struggling with the above instructions, consider this secure, user-friendly free Windows remote desktop software, for connecting to remote computers that are outside your LAN network (i.e. over the Internet).
-
Free for personal and commercial use
-
Safe authentication
-
Enterprise-level encryption
-
Share the URL to start a remote session
-
Zero firewall modifications
Here is a handy video on how to connect to the remote computers over the Internet with HelpWire:
Contrasting with conventional remote assistance tools that can be complicated to use, HelpWire boasts a simple and intuitive interface, enabling users to establish remote connections in just a few clicks and offering advanced remote support features.
Final Words
In this guide, we’ve navigated through various methods to enable Windows Remote Desktop over the Internet. From the secure, yet complex setup of VPNs, to router port forwarding with its inherent security risks, and finally to HelpWire, a straightforward and secure alternative. The choice between these methods depends on your comfort with technical setups and security requirements. VPNs offer robust security, router port forwarding grants direct access but with higher risks, and HelpWire provides an easy-to-use, secure solution without the hassle of complex configurations. Regardless of the method chosen, prioritize network security: use strong passwords and keep systems updated. Properly secured, remote desktop access is an effective tool for work or support remotely. Choose based on your technical comfort and security needs, and ensure a safe and efficient remote access experience.